

Thoracic Outlet Syndrome:
Anatomy, Causes, and Treatment with Clinical Somatics
Thoracic outlet syndrome might sound a little scary, but most cases are functional—meaning they can be prevented and often eliminated completely.
When tight muscles or poor posture compress the thoracic outlet, you may experience symptoms such as pain and numbness in your shoulder, arm, and hand. In this post we’ll talk about the anatomy of thoracic outlet syndrome, the most common causes of the condition, and how Clinical Somatics exercises can prevent and alleviate it.
What is thoracic outlet syndrome?
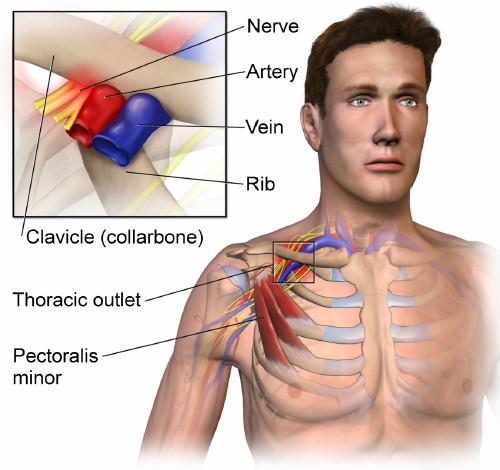
The thoracic outlet is a small space between the clavicle (collarbone) and the first rib (see image below). A bundle of nerves and blood vessels passes through the thoracic outlet and provides sensation, motor control, and circulation of blood to the chest, shoulder, arm, and hand.
The network of nerves that passes through the thoracic outlet is called the brachial plexus. The lower four cervical nerves and the first thoracic nerve emerge from the spinal cord, pass in between the scalene muscles in the neck, through the thoracic outlet, under the pectoralis minor, into the armpit, and down the arm. If the brachial plexus is compressed at any point along its path, you may feel the symptoms of thoracic outlet syndrome.
These symptoms include:
- Pain in the neck, shoulder, or arm
- Numbness or tingling in arm or hand
- Weakness or fatigue in the arm or hand
- Lack of color in the arm or hand
- Cold fingers, hand, or arm
- Weak or no pulse in the affected arm
- Swelling in the arm
What causes thoracic outlet syndrome?
Thoracic outlet syndrome can be caused by a structural issue, such as an extra rib, the growth of a tumor, or an injury to the area. But more often, thoracic outlet syndrome is a functional issue, caused by poor posture or chronic muscle tension in the neck, shoulder, and chest.
The nerves that form the brachial plexus emerge from the spinal cord in the neck. If you have forward head posture, your neck muscles will be tight and your cervical vertebrae will be compressed. This compression can lead to the nerves being impinged as they exit the spinal cord, and cause symptoms of thoracic outlet syndrome.
The brachial plexus then passes in between the anterior scalene muscle and the middle scalene muscle. The scalenes flex the head and neck forward, bend the head and neck to the side, rotate the head and neck to the side, and elevate the ribs when we inhale. If your scalenes are tight, or if you have forward head posture or chronic tension in your neck, your brachial plexus may be compressed as it passes in between the scalenes.
The pectoralis minor is the muscle most commonly implicated in thoracic outlet syndrome. However, before the brachial plexus reaches the pectoralis minor, it passes through the thoracic outlet. The clavicular fibers of the pectoralis major attach to the clavicle, as does the deltoid muscle. Chronic tightness in these two muscles creates a downward pull on the clavicle, compressing the brachial plexus.
The brachial plexus then passes under the pectoralis minor. If this muscle is tight—we’ll talk about why it and the previously mentioned muscles get tight in the next section—it will compress the brachial plexus, and cause symptoms of thoracic outlet syndrome.
Why do we develop the chronic muscle tightness that causes thoracic outlet syndrome?
The muscles of the neck, shoulders, and chest that we discussed in the last section become tight as a result of the way we use our body every day. If we engage in activities or adopt habitual postures that involve flexing the head and neck forward, rounding the shoulders and upper back, and rotating the shoulders inward and bringing our arms in toward our body, we can easily develop the patterns of muscular tightness that lead to thoracic outlet syndrome.
Some common causes of thoracic outlet syndrome are:
- Working at a computer
- Spending long periods of time looking downward at a mobile device
- Playing sports such as baseball, swimming, and gymnastics
- Weightlifting
- Playing a musical instrument
- Holding a baby for long periods of time
- Carrying a heavy bag
Thoracic outlet syndrome also occurs when people have had an injury like a broken arm and must keep their arm in a sling for a long period of time. The muscles in the neck, shoulders, and chest become tight due to both lack of use and instinctive protecting of the injured area.
Here’s why our muscles become tight when we overuse them:
The movement and level of contraction of our muscles is controlled by our nervous system. The way that our muscles move, and how much we keep them contracted, is actually learned over time by our nervous system.
Our nervous system learns certain ways of using our muscles based on how we choose to stand and move each and every day. Our nervous system notices the postures and movements that we tend to repeat, and it gradually makes these postures and movements automatic so that we don’t have to consciously think about them. Part of this process of automation is that our nervous system starts keeping certain muscles partially contracted all the time—this saves us time and conscious attention in carrying out repetitive actions. (Really, our nervous system is trying to be helpful!)
This learning process—that of developing what we refer to as muscle memory—allows us to go through the activities in our daily lives easily and efficiently. Unfortunately, if we tend to repeat unnatural, potentially damaging postures or movements—like certain types of athletic training, heavy lifting, or repetitive daily activities like working at a computer or carrying our baby on one side—our nervous system will learn those too. Our automatic neuromuscular learning process doesn’t discern what is good or bad for us—it just notices what we tend to repeat, and makes it automatic.
As our nervous system gradually learns to keep our muscles tight, gamma loop activity adapts. This feedback loop in our nervous system regulates the level of tension in our muscles. As our brain keeps sending the message to contract our muscles, gamma loop activity adapts and increases the resting level of tension in our muscles. Meanwhile, our proprioception (how we sense our body) adapts so that we’re not aware of the increased level of tension in our muscles.
This innate process of muscular learning takes place throughout our lives. It typically happens so gradually that we’re not aware of it until we notice the effects: tightness or pain, unnatural posture, limited movement, or structural damage to our joints and connective tissues.
How to alleviate thoracic outlet syndrome with Clinical Somatics exercises
To prevent and alleviate thoracic outlet syndrome, you need to release the chronic muscle contraction in your neck, shoulders, and chest, as well as your abdominals. The abdominals are often tight in people with thoracic outlet syndrome because of their tendency to round forward, bringing their rib cage downward.
If you try stretching or getting a massage to release your tight muscles, you’ll likely find that these approaches provide only temporary lengthening of muscles. Your muscles will tighten back up within a few hours due to the stretch reflex. Static stretching and massage do not change the messages that your nervous system is sending to your muscles to stay tight—active movement is necessary to retrain the nervous system.
The most effective way to reduce the tension in your muscles is with a movement technique called pandiculation. The technique of pandiculation was developed by Thomas Hanna, and is based on how our nervous system naturally reduces muscular tension. Pandiculation is the reason why Hanna’s method of Clinical Somatic Education is so effective in releasing tension, retraining posture, and relieving pain. Hanna created many self-pandiculation exercises that can be practiced on your own at home.
Pandiculation sends accurate feedback to your nervous system about the level of tension in your muscles, allowing you to change your learned muscular patterns, release chronic muscle tension, and retrain your proprioception. You can read more about pandiculation in this post.
If you’ve learned Clinical Somatics exercises from my online courses or from another Certified Clinical Somatic Educator or Hanna Somatic Educator, you can use this section to help guide you in releasing the muscles that are causing your thoracic outlet syndrome. If you’re new to Clinical Somatics, the best place to start is the Level One Course.
Now, some specific exercises. Here are the exercises from the Level One Course that help to relieve thoracic outlet syndrome:
Arch & Flatten: I recommend practicing this every day. It’s best to begin your practice with this exercise, because it gently releases the abdominal and lower back muscles and prepares you for the rest of your practice.
Arch & Curl: Practice this every day. Really squeeze your shoulders together as you curl up. Release your abdominal muscles as slowly as you possibly can on the way down, imagining that you’re resisting gravity. Then, release your shoulders down and elbows out to the side as slowly as you possibly can—try counting to 16 or more as you release.
Side Curl: This exercise releases the obliques; however, these can play a role in your TOS if your obliques are tighter on one side, pulling your rib cage down and causing you to round your shoulder forward. So, be sure to practice the Side Curl on the side in which you have TOS. To do this, lie down on your opposite side, and practice this exercise curling up to the side on which you have symptoms. Really try to get a sense of the muscles on the side of your waist contracting, then release them as slowly as you possibly can—resist gravity as you lower down. Completely relax for a few moments before repeating the movement.
One-Sided Arch & Curl: This exercise gives you the opportunity to do the Arch & Curl while focusing on just one side at a time. Like with the Side Curl, you can practice this just with the side in which you have TOS. To do this, lift up your knee on the side on which you have TOS, put your hand on the same side behind your head, and practice the exercise.
Diagonal Arch & Curl: This exercise is an important one for TOS sufferers to do on a daily basis, as it releases the pectoral muscles. Like with the two previous exercises, you can practice this just with the side in which you have TOS. To do this, bring your hand up behind your head on the side in which you have TOS, lift up your opposite knee, and practice the exercise.
Washcloth: You can practice this exercise as instructed, going back and forth from side to side. When rolling your shoulders forward and backward, notice how your right and left shoulders feel different. You can learn a great deal about your body by comparing your two sides. Feel free to practice just the upper body part of this exercise so that you can focus completely on the movement of your shoulders.
Flowering Arch & Curl: You can practice this exercise as instructed, and like the Washcloth, feel free to practice just the upper body part of the exercise so that you can focus completely on your shoulders and chest. The upper body part of this exercise is an important one for TOS sufferers to do, as it releases the pectoral muscles.
And more exercises from the Level Two Course:
Head Lifts: This exercise releases the neck muscles and corrects forward head posture. If you have TOS, you should do this exercise on a regular basis. Practice this after you’ve warmed up your abdominals and lower back muscles with the Arch & Flatten and Arch & Curl.
Scapula Scoops: Both parts of the Scapula Scoops are important for TOS sufferers. Part 1 helps to release the scalene muscles, and Part 2 releases the pectoral muscles. You can practice these as instructed, or do them just with the side in which you have TOS.
Diagonal Curl: This is a very important exercise for TOS sufferers, as it releases both the abdominals and pectorals. To practice this just on the side in which you have TOS, lie down on your opposite side, put your hand behind your head and let your upper body rotate open, and practice the exercise.
Shoulder Directions: This exercise releases the shoulder and chest muscles, and develops fine control of shoulder movements in all directions. To practice this just on the side in which you have TOS, lie down on your opposite side and practice the exercise.
Finally, be aware of how you’re using your body as you go through your daily life. Your progress with the exercises will be slower if you continue to do activities or habitual postures that are keeping you stuck in your patterns of tension and exacerbating your symptoms. Notice the tension that you hold in your neck, shoulders, chest, and abdominals, as well as how you might be using the sides of your body differently when you:
- Carry your bag or your child: Do you always use the same side? Do you round one shoulder forward, rotate it inward, and bring it in toward your body?
- Work at a computer: Do you use a mouse with the same hand a great deal? Do you spend a lot of time typing with your shoulders rounded forward and rotated inward? Do you bring your head and neck forward?
- Exercise: Do you lift weights or play sports that require throwing with one arm or using the chest and shoulders a great deal?
- Relax on your couch: Do you slouch down, rounding your upper back and shoulders?
- Sleep: Do you sleep more on one side than the other? Sleeping on your back is best; put a pillow under your knees if that makes you more comfortable.
Ready to start learning?
If you’d like to learn Clinical Somatics exercises at home, the best place to start is the Level One Course. This online course teaches the exercises through video demonstrations, audio classes, and written explanations.
Recommended reading:
The Pain Relief Secret: How to Retrain Your Nervous System, Heal Your Body, and Overcome Chronic Pain by Sarah Warren, CSE
Somatics: Reawakening the Mind’s Control of Movement, Flexibility and Health by Thomas Hanna