
How to Resolve Lower Crossed Syndrome with Clinical Somatics Exercises
In this article I’ll explain what lower crossed syndrome is and the muscular patterns involved. At the end of the article, I list which Clinical Somatics exercises are most effective at fixing the postural misalignment.
What is Lower Crossed Syndrome?
The term “lower crossed syndrome” was coined by Dr. Vladimir Janda, a Czech neurologist, professor, and researcher. Dr. Janda was a pioneer in the field of rehabilitation, and he founded the rehabilitation department at Charles University Hospital in Prague, Czechoslovakia. His work was in line with what we teach in Clinical Somatics: that the function of the nervous system can lead to muscular imbalances and dysfunctional posture and movement, which in turn can lead to chronic pain syndromes.
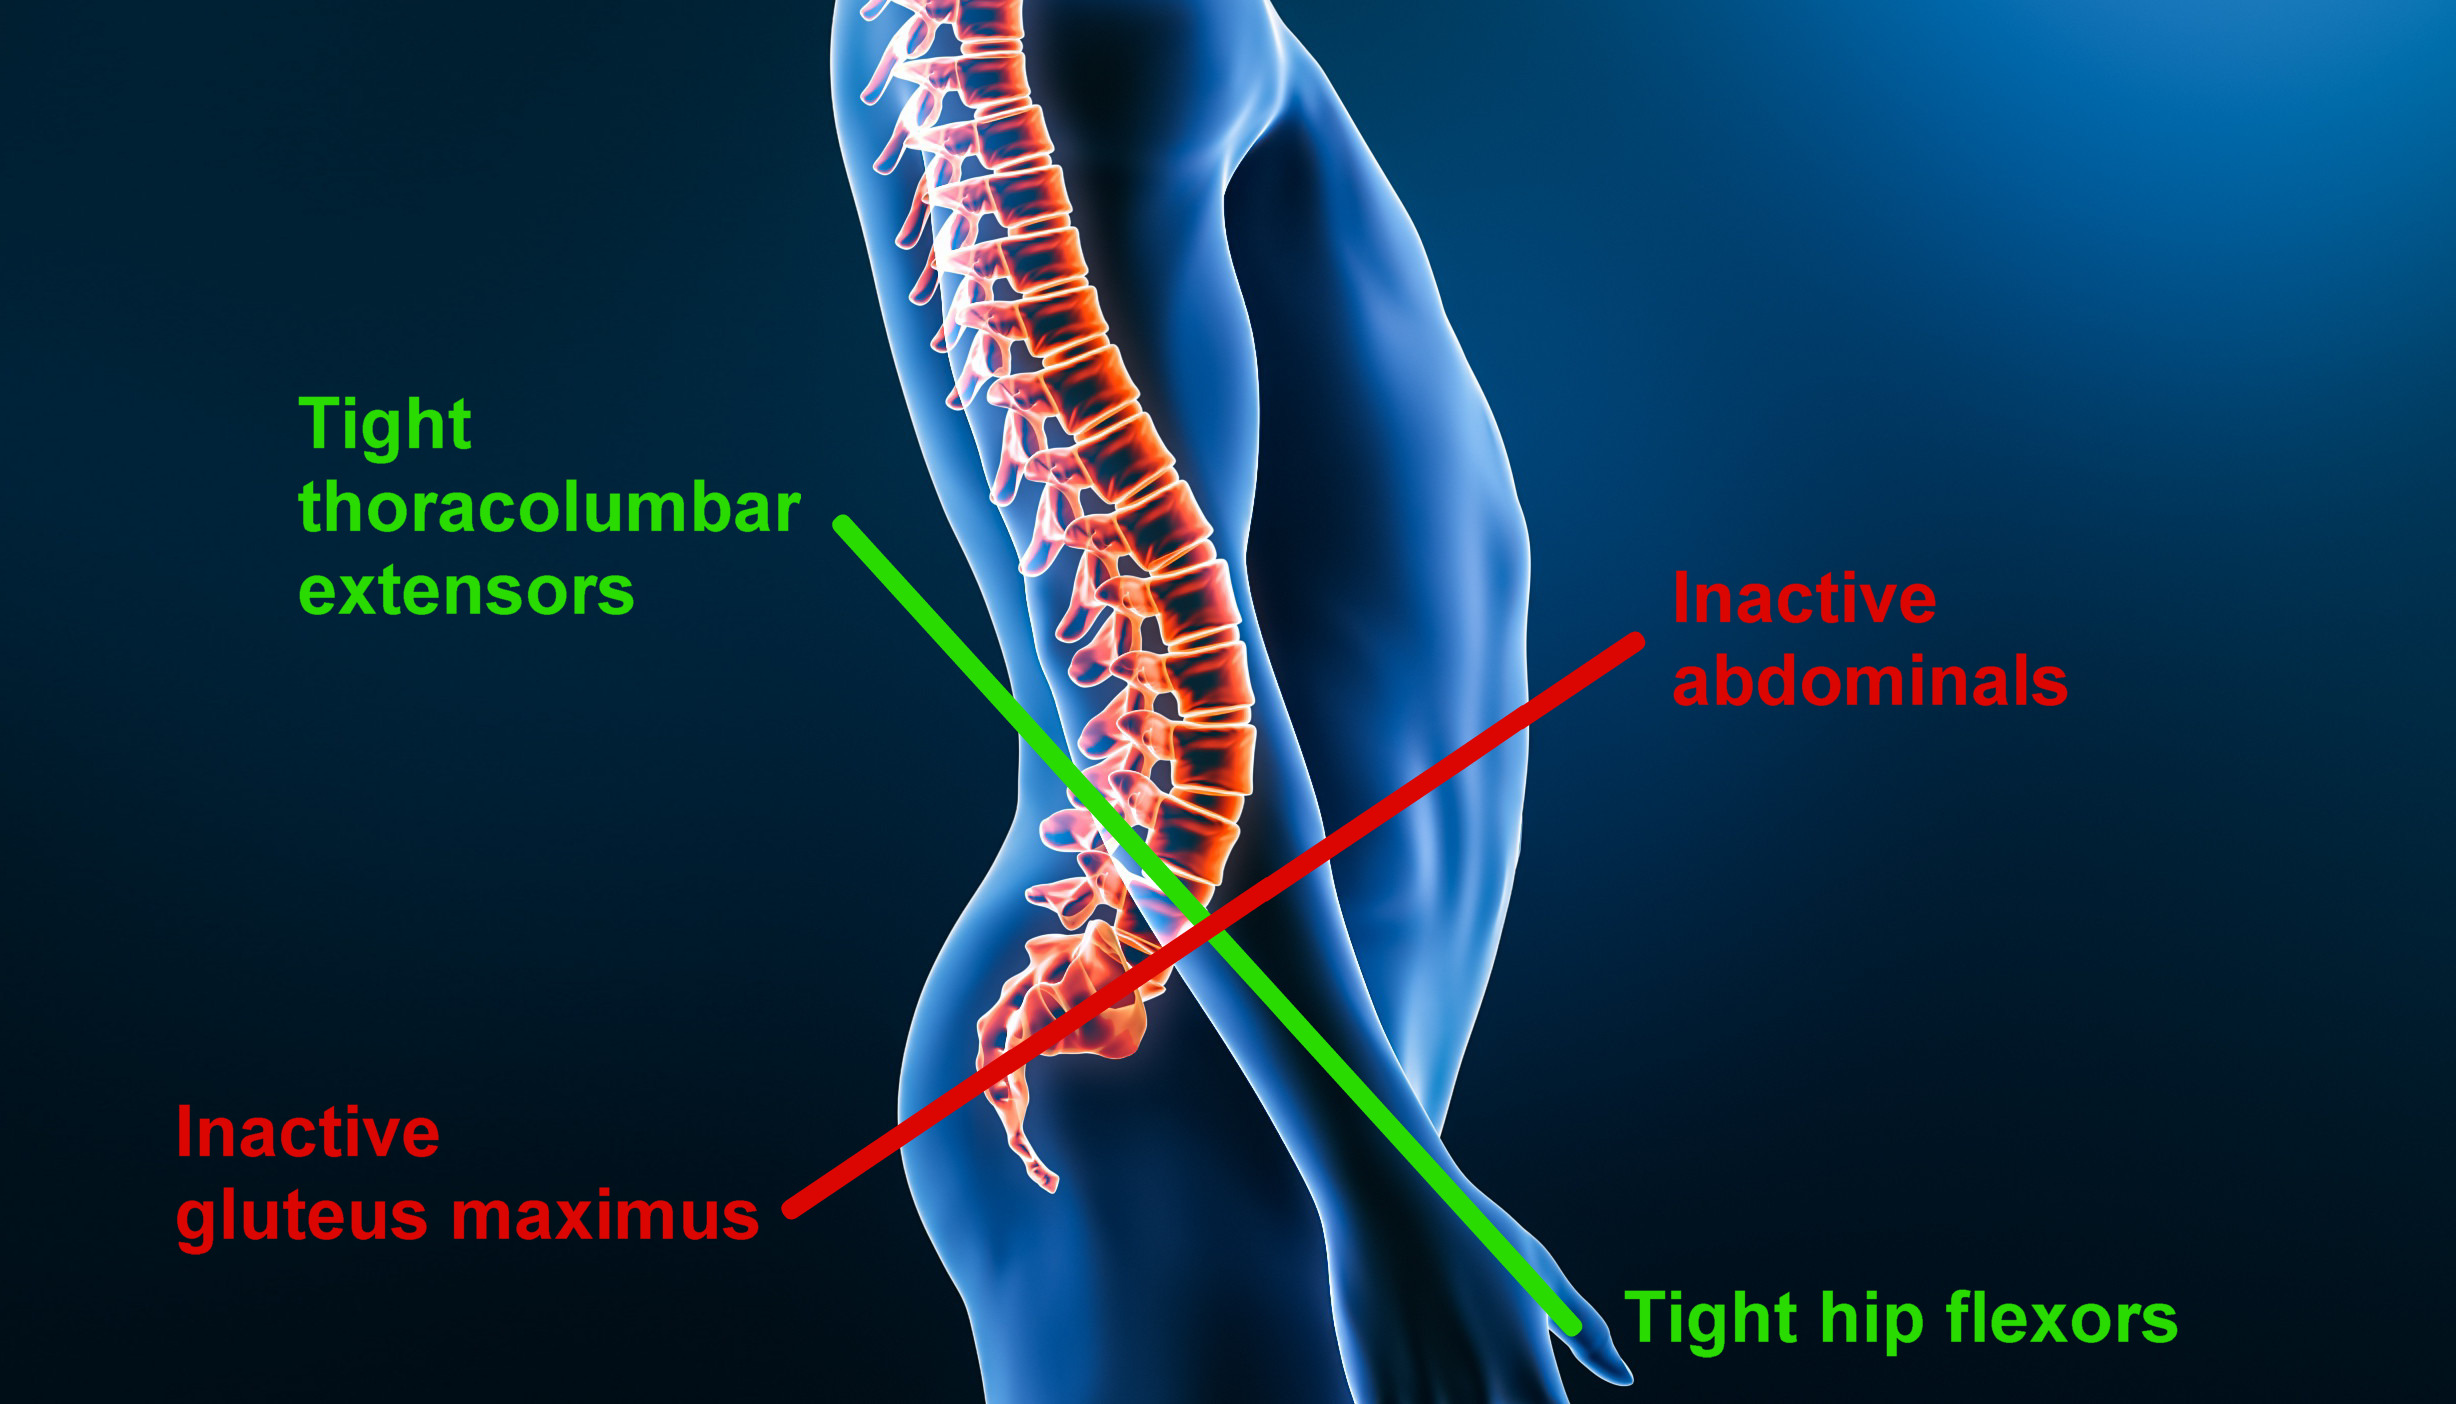
Lower crossed syndrome describes a pattern of tight and “weak” or inactive muscles in the core of the body. As shown in the diagram at the top of this post, these tight and inactive muscles form an X when viewed from the side of the body.
In this pattern, the extensor muscles of the thoracic and lumbar spine and the hip flexors (iliopsoas, rectus femoris, and others) are chronically tight. The muscles that do the opposing actions—the abdominals (transverse abdominis, internal and external obliques, and rectus abdominis) and gluteus maximus—are inactive.
In Clinical Somatics, we refer to this postural pattern as Green Light posture or the Action Response. These are all just different terms for the same muscular pattern.
As the thoracolumbar extensors and hip flexors become chronically tight, tipping the pelvis forward and creating an exaggerated arch in the lower back, the abdominals and gluteus maximus are used less and less. It becomes increasingly difficult to voluntarily contract these muscles so they can do their intended function, because they have to fight against the opposing muscles that are being held tight by the nervous system. Thus, the abdominals and gluteus maximus get labeled as “weak,” but a more accurate term is inactive or inhibited.
Working to activate these inactive muscles will not be productive unless you also release the chronically tight antagonist muscles. As they release, you’ll become better able to develop voluntary control and strength in the inactive muscles.
Lower Crossed Syndrome may occur along with or be a causative factor in the following conditions
- Lower back tension and pain
- Hyperlordosis
- Hip tension and pain
- Disc degeneration
- Sciatica
- Iliopsoas syndrome
- Snapping hip syndrome
- Upper crossed syndrome
Why do we develop lower crossed syndrome?
Why do our back extensors and hip flexors become tight enough to cause lower crossed syndrome? And why does it happen to some people and not others?
The movement and level of contraction of our muscles is controlled by our nervous system. The way that our muscles move, and how much we keep them contracted, is actually learned over time by our nervous system.
Our nervous system learns certain ways of using our muscles based on how we choose to sit, stand, and move each and every day. Our nervous system notices the postures and movements that we tend to repeat, and it gradually makes these postures and movements automatic so that we don’t have to consciously think about them.
This learning process—that of developing what we refer to as muscle memory—allows us to go through the activities in our daily lives easily and efficiently. Unfortunately, if we tend to repeat unnatural postures or movements, our nervous system will learn those too. Our automatic neuromuscular learning process doesn’t discern what is good or bad for us—it just notices what we tend to repeat, and makes it automatic.
There are some types of athletic training that can tend to lead to lower crossed syndrome, including but not limited to:
- Dance: due to flexing the hips, arching the back to achieve upright posture, and arching the lower back to compensate for limited lateral rotation in the hips
- Gymnastics: due to arching the back, doing back bends, and flexing the hips
- Weightlifting: due to overusing the back muscles when lifting
- Running: due to overuse of the hip flexors
But, you may find that no particular physical training has led to your lower crossed syndrome. Patterns of muscle tension can simply develop over time based on stress level, personality, and regular daily activities.
As your nervous system gradually learns to keep your muscles tight, gamma loop activity adapts. This feedback loop in your nervous system regulates the level of tension in your muscles. As your brain keeps sending the message to contract your muscles, gamma loop activity adapts and starts keeping your muscles tight all the time.
Meanwhile, your proprioception (your internal sense of your body position) adapts so that you’re not aware of the increased level of tension in your muscles. Your proprioception also adapts to your body position; so as your nervous system gradually starts holding your lower back in an arch and your pelvis tilted forward, it will feel to you as though your lower back and pelvis aligned correctly.
The most effective Clinical Somatics exercises to resolve lower crossed syndrome
First, if you’re not familiar with pandiculation and why it’s the most effective way to reset gamma loop activity and release chronic muscle tension, I recommend that you read What is Pandiculation?
Below I’ve listed the exercises from the Level One & Two Courses that are most helpful for releasing the pattern of muscle contraction present in lower crossed syndrome. Pandiculation exercises don’t just release chronic muscle contraction—they also improve voluntary control of inactive muscles. So, there are exercises listed below that work with the abdominals and gluteus maximus as well as the thoracolumbar extensors and hip flexors.
If you’re just starting your Clinical Somatics practice, be sure to read Developing Your Own Daily Practice.
If your time and attention for practicing these exercises is limited, I recommend doing the first four exercises listed below (Arch & Flatten, Back Lift, Arch & Curl, and Iliopsoas Release), followed by Proprioceptive Exercise 1 from Level Two.
LEVEL ONE COURSE
Arch & Flatten: This exercise is the most basic movement in Clinical Somatics, and works directly with the muscles involved in lower crossed syndrome. The Arch & Flatten allows you to release and regain voluntary control of the extensors of the lower back and the abdominals.
Back Lift: This exercise allows you to release and regain control of the extensors of the back and the gluteal muscles.
Arch & Curl: This exercise is a bigger version of the Arch & Flatten. If your back muscles are tight, engaging your abdominal muscles to curl up may be challenging at first, but it will get easier as your back muscles release.
Iliopsoas Release: This exercise works directly with releasing tension in the iliopsoas, which is central to lower crossed syndrome.
One-sided Arch & Curl and Diagonal Arch & Curl: These have the same benefits as the Arch & Curl, but they focus on one side of your body at a time, allowing you to even out imbalances in your muscular patterns.
Hip Rotation: While internal or external hip rotation is not a defining element of lower crossed syndrome, some of the muscles that rotate the hip are the same as those that flex the hip. So, working with releasing and regaining control of the hip rotators is another way to address the overactive hip flexors and inactive gluteus maximus that are present in lower crossed syndrome.
Flowering Arch & Curl: This is a full-body version of the Arch & Curl, involving arching and curling of the back, internal and external rotation of the arms, and internal and external rotation of the hips. You can practice this movement once you’re very comfortable with the Arch & Curl and Hip Rotation exercises.
LEVEL TWO COURSE
Proprioceptive Exercise 1: This is a very important exercise for anyone with lower crossed syndrome to practice regularly, as it allows you to retrain your posture and proprioception (your internal sense of your body position). This exercise is practiced in front of a full-length mirror, allowing you to compare how your posture feels internally to what you see in the mirror.
Quadriceps Releases: The rectus femoris (a quadriceps muscle) flexes the hip, and is tight in lower crossed syndrome. It is important to practice Quadriceps Release Version 1 regularly if you can. If you cannot do it comfortably, do Version 2, and be sure to practice the Iliopsoas Release regularly as well until you are able to do Version 1.
Gluteal Release: This exercise pandiculates the gluteus maximus, allowing you to regain voluntary control.
Iliotibial Band Release: This exercise pandiculates the IT band and tensor fascia latae (TFL); the TFL assists in hip flexion, so it can be tight in lower crossed syndrome.
Standing Hamstring Release: While called a hamstring release, this exercise also pandiculates the extensors of the back and the gluteal muscles.
Seated Hamstring Release: This is not a true pandiculation, but it involves slowly bending and then lengthening each leg one at a time. The back is also lengthened in this exercise, which is why it can be helpful for lower crossed syndrome. If you’re not in pain, this exercise feels good; but if you have back pain or disc issues, I recommend skipping this one.
Head & Knee Lifts: Similar to the Back Lift, this exercise allows you to release and regain control of the extensors of the back and the gluteal muscles.
Recommended reading:
The Pain Relief Secret: How to Retrain Your Nervous System, Heal Your Body, and Overcome Chronic Pain by Sarah Warren, CSE
Somatics: Reawakening the Mind’s Control of Movement, Flexibility and Health by Thomas Hanna