
How to Fix Pelvic Torsion (Twisted Pelvis) With Clinical Somatics Exercises
In this article I explain what pelvic torsion is and the muscular patterns involved. At the end of the article, I list which Clinical Somatics exercises are most effective at fixing the misalignment.
Scroll down to watch Sarah’s video on this topic
What is pelvic torsion (twisted pelvis)?
The skeleton of the pelvis is made up of two large coxal bones, often referred to as hip bones, along with the sacrum and the coccyx, the bones at the base of the spine. It is common for people to have postural patterns in which the entire pelvis is tipped either forward or backward (see image below). When the pelvis is tipped forward, it is referred to as anterior pelvic rotation or tilt. When the pelvis is tipped backward, it is referred to as posterior pelvic rotation or tilt.
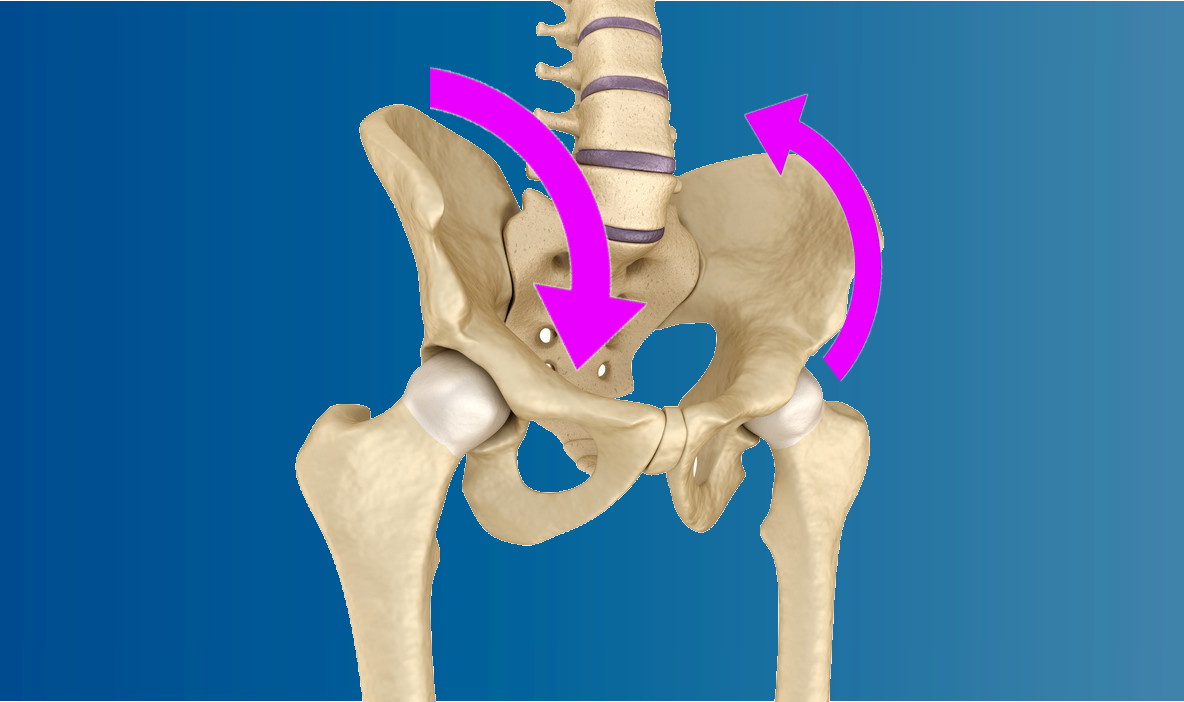
Pelvic torsion, also called twisted pelvis, occurs when one coxal bone is rotated forward (in anterior pelvic rotation) or backward (in posterior pelvic rotation) in relation to the other coxal bone. It is possible that one coxal bone is rotated forward while the other is rotated backward. It is also possible that one coxal bone is rotated forward while the other is in a neutral upright position, or that one coxal bone is rotated backward while the other is in a neutral upright position.
If chronic muscle tension is keeping your pelvis stuck in a twisted position, the misalignment can affect the posture, movement, and patterns of muscle tension in your entire body, and can often result in pain.

It’s easy to confuse pelvic torsion with lateral pelvic rotation, which occurs when the pelvis turns to the right or the left, as if you’re doing the Twist.
Pelvic torsion might also be confused with lateral pelvic tilt, in which one hip is held higher than the other.
To confuse matters more, it’s common for two or even all three of these postural patterns to occur together!
Pelvic torsion (twisted pelvis) may occur along with or be a causative factor in the following conditions:
- Misalignment and pain in the hips, knees, and ankles
- Lateral pelvic rotation
- Functional leg length discrepancy (lateral pelvic tilt)
- Lower back pain and disc problems
- Idiopathic scoliosis
- Sacroiliac joint dysfunction and pain
- Iliotibial band syndrome
- Sciatica
- Iliopsoas syndrome
- Snapping hip syndrome
The patterns of muscle tension involved in pelvic torsion (twisted pelvis)
On the side of the pelvis in which the coxal bone is tipped forward in anterior rotation, the hip flexors are chronically tight. The primary hip flexors are the psoas major, iliacus, and rectus femoris, which are assisted by the pectineus, sartorius, and tensor fasciae latae.
On this side, the muscles that extend (arch) the lower back are also tight. These lumbar extensors include the quadratus lumborum, erector spinae group, transverospinalis group, intertransversarii, interspinalis, and latissimus dorsi.
On the side of the pelvis in which the coxal bone is tipped backward in posterior rotation, the internal and external obliques and the psoas major are chronically tight. The obliques are working to tip the coxal bone backward, like you’re doing a standing crunch and rounding your lower back. The psoas major, with its attachments to the lumbar spine and lesser trochanter of the femur bone, is working to do the same thing. The psoas major is typically tight in both anterior and posterior pelvic rotation; the other muscles involved determine whether the hip tips forward or backward.
If you have one hip tipped forward or backward and the other is in a neutral position, it is still likely that you have chronically tight muscles on the neutral side. That side has to constantly work to stabilize the pelvis and compensate for the forward or backward rotation of the other side.
Why do we develop pelvic torsion (twisted pelvis)?
Why do our hip and core muscles become tight enough to cause lateral pelvic rotation? And why does it happen to some people and not others?
The movement and level of contraction of our muscles is controlled by our nervous system. The way that our muscles move, and how much we keep them contracted, is actually learned over time by our nervous system.
Our nervous system learns certain ways of using our muscles based on how we choose to sit, stand, and move each and every day. Our nervous system notices the postures and movements that we tend to repeat, and it gradually makes these postures and movements automatic so that we don’t have to consciously think about them.
This learning process—that of developing what we refer to as muscle memory—allows us to go through the activities in our daily lives easily and efficiently. Unfortunately, if we tend to repeat unnatural postures or movements, our nervous system will learn those too. Our automatic neuromuscular learning process doesn’t discern what is good or bad for us—it just notices what we tend to repeat, and makes it automatic.
The muscular patterns that cause pelvic torsion can be caused by repetition of normal daily activities, like carrying your bag on the same side every day or sitting with your legs crossed in the same position. They can also be caused by athletic training, especially types that involve a lot of lower body movements and hip flexion, like soccer or dance.
As your nervous system gradually learns to keep your muscles tight, gamma loop activity adapts. This feedback loop in your nervous system regulates the level of tension in your muscles. As your brain keeps sending the message to contract your muscles, gamma loop activity adapts and starts keeping your muscles tight all the time.
Meanwhile, your proprioception (your internal sense of your body position) adapts so that you’re not aware of the increased level of tension in your muscles. Your proprioception also adapts to your body position; so as your nervous system gradually starts holding your pelvis in a twisted position, it will feel to you as though it is aligned correctly.
The most effective Clinical Somatics exercises to fix pelvic torsion
First, if you’re not familiar with pandiculation and why it’s the most effective way to release chronic muscle tension, I recommend that you read What is Pandiculation?
Second, it’s very important that you read the article How to Even out the Imbalances in Your Body. This article gives essential advice that you should follow when tailoring your daily Clinical Somatics practice to address the imbalances in your muscular patterns—which are significant in pelvic torsion.
Below I’ve listed the exercises from the Level One & Two Courses that are most helpful for releasing the patterns of muscle contraction present in pelvic torsion. This is too many exercises to practice every day, so pick and choose depending on which exercises you feel the most benefit from. If you’re just starting your Clinical Somatics practice, be sure to read Developing Your Own Daily Practice.
LEVEL ONE COURSE
Arch & Flatten and Arch & Curl: These exercises are the most basic movements in Clinical Somatics, and they work directly with the muscles involved in pelvic torsion. They allow you to release and regain voluntary control of the extensors of the lower back, the abdominals (which include the obliques), and the psoas.
Back Lift: Practice this more or only with the side on which your hip is tipped forward. To do this: If your right hip is tipped forward, turn your head to the left to practice the movement, and if your left hip is tipped forward, turn your head to the right.
Side Curl: This exercise releases the obliques, quadratus lumborum, and psoas major, which all play major roles in pelvic torsion. Practice this on both sides, and if you feel a significant imbalance, you can focus your practice more on one side than the other.
One-sided Arch & Curl and Diagonal Arch & Curl: These are two of the most important exercises to practice regularly if you have pelvic torsion. These exercises allow you to focus on the anterior and posterior pelvic rotation of each side of your pelvis independently. Notice the differences you feel between your right and left sides as you practice these movements, and try to learn from your more coordinated side.
Iliopsoas Release: This is an important exercise to practice daily. Your iliopsoas is likely tight on both sides, but if you find a significant imbalance, you can spend more time and focus working with the tighter side.
Hip Slides & Hip Raises: These movements allow you to release and regain control of your obliques, quadratus lumborum, and psoas major. They also allow you to focus on each side independently, and to learn from your more coordinated side.
Hip Rotation: While internal or external hip rotation is not a defining element of pelvic torsion, some of the muscles that rotate the hip are the same as those that flex the hip. So, working with releasing and regaining control of the hip rotators is another way to address the overactive hip flexors that are present in pelvic torsion.
Hip Circles: Once you’re very comfortable with Hip Slides & Hip Raises, you can start working with Hip Circles, an advanced movement that explores the natural movement that the hips make while walking and running.
LEVEL TWO COURSE
Pelvic Clock: This exercise allows you to develop fine control of the muscles that move the pelvis in various directions. Notice where during this exercise you feel more coordinated and less coordinated, and try to learn from your more coordinated side.
Proprioceptive Exercise 1: This exercise addresses both anterior and posterior pelvic tilt. Notice any differences you feel between your right and left side as you practice this movement.
Proprioceptive Exercise 2: This exercise addresses lateral pelvic tilt, which can occur along with pelvic torsion.
Standing Hamstring Release: This exercise releases the lower back in addition to the hamstring, so it is helpful for the side on which the hip is rotated forward.
Hip Directions: Practice this on both sides, and notice the differences between your two sides.
Quadriceps Release: Your rectus femoris (a quadriceps muscle) is one of the hip flexors that acts to tip the hip forward. So, you may find it helpful to practice this more or only on the side on which your hip is tipped forward.
Iliotibial Band Release: The iliotibial band is likely to be tighter on the side on which your hip is tipped forward, since the tensor fascia latae (which is located at the top of the iliotibial band) assists to flex the hip. So, you may find it helpful to practice this more or only on the side on which your hip is tipped forward.
Seated Hamstring Release: This exercise lengthens both the lower back and hamstrings, so you may find it helpful to practice this more or only on the side on which your hip is tipped forward.
Recommended reading:
The Pain Relief Secret: How to Retrain Your Nervous System, Heal Your Body, and Overcome Chronic Pain by Sarah Warren, CSE
Somatics: Reawakening the Mind’s Control of Movement, Flexibility and Health by Thomas Hanna